OPSI Docker on ARM64: Cost-Efficient Solutions for Small Businesses
 Thomas Fritzsche,
Heike Jurzik
Thomas Fritzsche,
Heike Jurzik Essentials
 July 11, 2024
With OPSI version 4.3, there is now a solution for small offices: an OPSI depot server as a Docker container on ARM64 devices like the Raspberry Pi 4 or the Orange Pi 5 Plus.
Quick Setup: Depot Servers out of the Box for Small Offices
The best ideas often come from our customers. We get asked all the time if there’s a simple and efficient way to set up an OPSI depot server for small offices or branches with up to 10 clients. The short answer is: Absolutely!
The long answer is what this article is all about. We’ll show you how to use OPSI as a Docker container—not on the usual hardware, but on a Single Board Computer (SBC) on ARM64. We’ve had great success with the Raspberry Pi 4 and the OrangePi 5 Plus. These little devices are powerful, cost-effective, and save a ton of space compared to traditional servers.
So, let’s dive into the hardware selection and the test environment.
Hardware Requirements for OPSI on ARM64 Single Board Computers
To run an OPSI depot server on a Single Board Computer (SBC) on ARM64, you’ll need the following hardware:
- A single board computer with at least 4 cores and 4 GB of RAM
- External storage (SSD/SATA/NVMe) with 256 GB or more
- LAN connection with at least 100 MBit, preferably 1 GByte
The size of the external hard drive mainly depends on the size of the depot and the number of packages provided there.
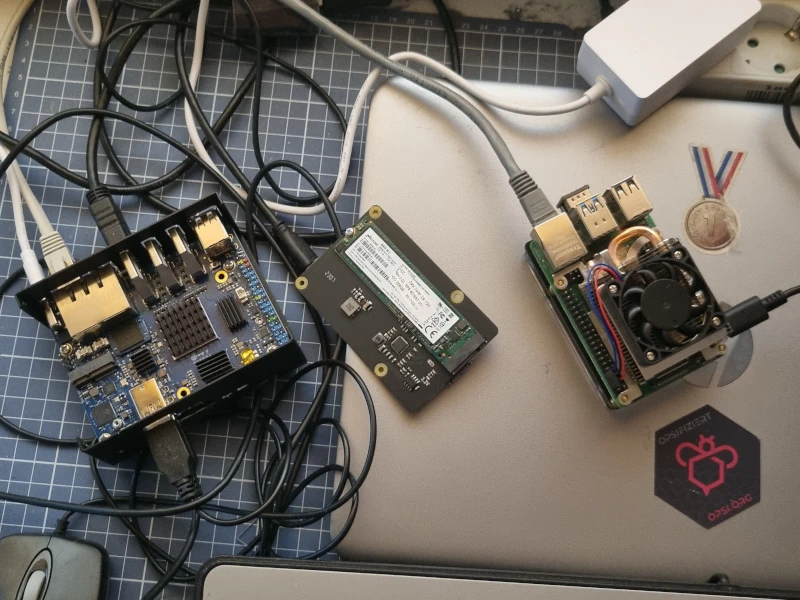
Thomas uses two single board computers in his test environment: a Raspberry Pi 4B and an OrangePi 5 Plus. His mini computers are equipped with the following:
Raspberry Pi 4B
- 8 Gigabytes of RAM: This is sufficient for most applications and ensures smooth performance.
- SSD-HAT: A Hardware Attached on Top is an expansion board specifically developed for the Raspberry Pi. The SSD-HAT allows you to connect an SSD directly to the Raspberry Pi, significantly improving storage and data transfer speeds.
- 128 GB SATA SSD: The SSD (Solid State Drive) significantly improves system performance and reliability compared to a traditional SD card.
OrangePi 5 Plus
- 16 Gigabytes of RAM: This makes the mini computer particularly powerful.
- 256 GB eMMC: eMMC (embedded MultiMediaCard) is an internal storage directly mounted on the board, offering fast read and write speeds.
- 1 TB NVMe-SSD: NVMe (Non-Volatile Memory Express) is an interface for SSDs that enables extremely high data transfer speeds. With 1 terabyte of storage, this SSD offers significantly more capacity and speed than traditional SATA-SSDs.
Tip
If your hardware has multiple storage devices (for example, the OrangePi has an eMMC for operating system packages and an NVMe-SSD for data), you can store both depot and repository data on them.
SBC Operating Systems: Raspberry Pi OS and Debian GNU/Linux
First, equip the single board computer with a 64-bit operating system. Raspberry Pi OS for the Raspberry Pi is based on Debian GNU/Linux. Therefore, the system is perfectly suited for opsi.
For the Orange Pi, Debian GNU/Linux is used. The official download page lists several images; Thomas has installed Orangepi5plus_1.0.6_debian_bullseye_desktop_xfce_linux5.10.110.7z on his SBC.
Note
It’s best to adjust the list of package sources after installing the operating system. Enter repositories that are geographically close to you.
Configuring and Testing the Network
Next, adjust the network configuration on the single board computer. Assign the computer a static IP address and a hostname and domain name that fit your environment. Verify that the DNS resolution is working.
Also, test whether you can reach the OPSI config server from the single board computer via HTTPS on port 4447. Port 4447/TCP is the standard port for the central OPSI service opsiconfd and is used for the OPSI config server to access the packages on the OPSI depot server. You can quickly test if the connection works in a terminal using the curl command. By default, the package is not installed; install it if necessary:
sudo apt update
sudo apt install curl ca-certificates
curl --insecure https://<fqdn>:4447/public
Replace <fqdn> with the FQDN or the IP address of the OPSI config server. The public directory is usually accessible on the config server without authentication. As a response, you will receive an XML file.
Raspberry Pi 4B/OrangePi 5 Plus: Installing Docker
Install Docker on the mini computer. First, import the Docker GPG key:
sudo install -m 0755 -d /etc/apt/keyrings
sudo curl -fsSL https://download.docker.com/linux/debian/gpg -o /etc/apt/keyrings/docker.asc
sudo chmod a+r /etc/apt/keyrings/docker.asc
Next, add the Docker repository. You can crate a new file in the /etc/apt/sources.list.d/ directory:
echo \
  "deb [arch=$(dpkg --print-architecture) signed-by=/etc/apt/keyrings/docker.asc] https://download.docker.com/linux/debian \
  $(. /etc/os-release && echo "$VERSION_CODENAME") stable" | \
  sudo tee /etc/apt/sources.list.d/docker.list > /dev/null
Update the list of available packages and upgrade the system to the latest version:
sudo apt update
sudo apt upgrade
After that, install the following packages along with all dependencies:
sudo apt install docker-ce docker-ce-cli containerd.io docker-buildx-plugin docker-compose-plugin
Make sure Docker is up and running smoothly and run docker run --rm hello-world. This command will download the image from Docker Hub (if it’s not already on your system), create a container from the hello-world image, and execute it. You’ll see a confirmation message in the terminal, showing that everything is working fine. The container will then automatically stop and exit.

Cloning OPSI Docker Repository and Adjusting the Configuration
Clone the OPSI GitHub repository and navigate to the opsi-docker/opsi-server directory:
git clone https://github.com/opsi-org/opsi-docker.git
cd opsi-docker/opsi-server
You’ll find the docker-compose.yml configuration file there, which you can edit in a text editor. Scroll down to the volumes section and comment out the following lines by adding a hash (#) at the beginning:
volumes:
  mysql_data:
    driver: local
  grafana_data:
    driver: local
Since you’re setting up a depot server, you can also comment out the MySQL and Grafana entries in the services section.
Note
Make sure to also disable mysql in the opsi-server section under the depends_on attribute.
In the redis section, replace the listed image (redislabs/redistimeseries:latest) since it doesn’t work on the ARM architecture. Instead, use the following:
redis:
    image: redisfab/redistimeseries:1.10.12-arm64v8-jammy
In the environment section, there are some environment variables for the containers. The passwords set there should match those of the OPSI config server. This includes the entries for OPSI_ADMIN_PASSWORD and OPSI_ROOT_PASSWORD. Also, define OPSI_HOST_ROLE:
OPSI_HOST_ROLE: depotserver

Creating Your Own OPSI Image on ARM64
Since the uib repository on Docker Hub only provides images for the x86-64 platform, and your single board computer is an ARMv8-64 system, you’ll need to build the image yourself. Docker will create images suitable for the host platform unless a different target system is specified during the build process:
sudo docker build -t opsi-armv8:4.3 .
Wait for the build process to complete—this can take up to 30 minutes.

Connecting New Depot to Config Server
To connect the new depot server to the config server, first create a host object on the config server. The quickest way to do this is through the admin page. Open the address https://<fqdn>:4447/admin in your browser; replace <fqdn> with the FQDN or IP address of the OPSI config server. Log in and switch to the Depots tab.

Below the list of existing depots, you can create a new one. In the New depot ID field, enter the FQDN of the depot server. Optionally, add a description and click Create depot. This will give you the host key, which you should enter along with the service URL of the config server in the docker-compose.yml file:
OPSI_SERVICE_ADDRESS:
OPSI_HOST_KEY:
Configuring Storage Locations (volumes) for Redis and opsi
In the docker-compose.yml file, you can also specify the storage locations for Redis and the OPSI depot. Attach the external storage to the single board computer and partition the hard drive; we recommend using the Ext4 file system. After mounting the drive (e.g., under /mnt/data), adjust the volumes entries in docker-compose.yml accordingly:
services:
[...]
  redis:
  [...]
  volumes:
    - redis_data:/data
  [...]
  opsi-server:
  [...]
    volumes:
      - opsi_data:/data
Starting and Testing the Container Stack
Now you can start the stack with the command (docker-compose -f docker-compose.yml up). In the terminal, you’ll see many messages, including information about starting the two defined services, opsi-server and redis. Once you see a message like this, the depot server has successfully started:
opsi-server_1 | [1] [2024-05-22 06:41:38.002] [] Switching to user opsiconfd (opsiconfd.py:106)
End the test run with [Ctrl]+[C] and start the service in the background (using the -d parameter):
docker-compose -f docker-compose.yml up -d
After a short time, the prompt will return, and you can now check if the stack is running completely with the command docker container ps.

Also, check if the depot server is serving its admin page. Open the address https://<docker-host>:4447/admin in your web browser. You should now see the login dialog and can log in with the username adminuser and the password specified in the docker-compose.yml.
Final Tweaks and Settings
If you can only reach the new depot server by its IP address and not by its FQDN, adjust the network settings and add the necessary entries to the DNS server. Additionally, you should check the depot properties. The easiest way to do this is via the opsi-configed management interface. On the Depot Configuration tab, check if the entry for repositoryRemoteUrl is correct. If the address starts with smb://, change it to webdavs://. Since the Docker image does not support Samba, access via the SMB protocol will not work.

Next, test the new depot and install an OPSI package. Open a terminal on the OPSI config server, navigate to the /var/lib/opsi/repository directory, and run opsi-package-manager; specify the new depot server with the -d option and use -vv for very verbose feedback.

Go back to opsi-configed, select the new depot server, and open the Standard Properties tab. In the main window, you will see the OPSI products available for distribution on this depot. You can now proceed as usual, assign clients to the depot, and install products.
Important Notes for Operation
As mentioned, the depot server as a Docker container does not support Samba shares. Instead, WebDAV is used to share files. This also applies to the client agent. Ensure that the OPSI client agent installs the server certificate during installation.
If you want to assign existing OPSI clients to the new depot, you may need to reinstall the client agent. In opsi-configed, check the host parameter opsiclientd.global.install_opsi_ca_into_os_store for the respective clients. If this is set to false, change it to true. This will install the server certificate of the new depot into the operating system’s certificate store on the client.
Conclusion: New Depots in 2 to 3 Hours
If you’re familiar with Single Board Computers (SBC), setting up the new depot can be done in just a few hours. Affordable single board computers with external storage media are ideal as OPSI depot servers—they consume little energy while still being powerful.
Of course, there are always ways to tweak and improve the setup and processes. We’d love to hear your thoughts and answer any questions in the OPSI forum.